Magento extension
1. Installing Magento ®
|
This guide refers to a deprecated Magento version. If you are still using this version, we strongly recommend using Magento 2. Please check out our dedicated guide to learn how to safely switch from Magento 1 to 2. |
1.1 Requirements
- PHP 5.4+
- An active Worldline account
- The supported Magento ® Community and Enterprise Edition versions can be retrieved from the "Official Worldline Extension" page
1.2 Installing Magento 1.7 and above
2. Configuration
2.1 Worldline back office
Login to your Worldline back office to enter the following settings.
2.1.1 Option activation requirements
Depending on the Worldline subscription you have selected it might be necessary to activate additional mandatory options in your Worldline account.
These options are:
- OPC
- DirectLink (New Payment)
- DirectLink (Maintenance)
- D3D
- Alias Manager (for more information, go to Credit card with Alias Manager).
Please check if these options are activated by default. If this is not the case please contact our Sales team for activation.
The Magento ® Worldline extension offered by Wordline might not work in conjunction with other extensions. To avoid malfunction we recommend to disable any other additional extension in Magento ®.
2.1.2 User management
The shop needs a separate API-User to communicate with Worldline.
Create the API-User:
- Go to "Configuration > Users".
- Select "New User".
- Select a USERID (for example APIUSER).
- Fill in the name and an existing email address (the field "External USERID" can be left empty).
- Select the profile "Administrator".
- Select the Access Type "API only".
- Write down the USERID and the password which you have created.
Note: the USERID and the password may not contain any special characters.
2.1.3 Technical information
Configure the technical information in the Worldline back office:
- Go to "Configuration > Technical Information > Global Transactionparameters".
- In the "Default operation code" section; select "Sale" or "Authorisation".
- In the "Payment retry" section; change the value if you want to.
- Click the "Save" button.
- Select the "Global security parameters" tab.
- In the "Hashing method" section; select "SHA-512" for "Hash algorithm" and "UTF-8" for "Character encoding".
- In the "Template" section; select "No" for "Enable JavaScript check on template".
- Click the "Save" button.
- Select the "Data and origin verification" tab.
- In both the "Checks for e-Commerce & Alias Gateway" and "Checks for Worldline DirectLink and Worldline Batch (Automatic)" sections; fill in the "SHA-IN pass phrase". Both keys have to be alphanumeric only and both keys must have the same value.
- Select the "Transaction feedback" tab.
- In the "Hosted Payment Page" section in the "HTTP redirection in the browser" subsection; select "I would like to receive transaction feedback parameters on the redirection URLs" and deselect "I would like Worldline to display a short text to the customer on the secure payment page if a redirection to my website is detected ...".
- In the "Hosted Payment Page" section in the "Direct HTTP server-to-server request" subsection ...
- Select "Online but switch to a deferred request when the online requests fail"
- Fill in the value "YOUR_SHOP_URL/ops/api/postBack" in both fields for "URL of the merchant's post-payment page".
- Select "POST" as "Request method".
- In the "Hosted Payment Page" section in the "Dynamic e-Commerce parameters" subsection; select all available parameters except "ECOM_BILLTO" and "ECOM_SHIPTO" since these can easily result in transmission errors.
- In the "All transaction submission modes" section; fill in the "SHA-OUT pass phrase". The SHA-OUT pass phrase must be identical to the previously entered
SHA-IN pass phrase. - In the "HTTP request for status changes"; select "For each offline status change (payment, cancellation, etc.)." and fill in the value "YOUR_SHOP_URL/ops/api/directLinkPostBack".
- Click the "Save" button.
- Select the "Transaction e-mails" tab.
- In the "E-mails to the merchant" section; perform the following optional actions ...
- Fill in you email address.
- Select "Yes, for all transaction submission modes."
- Select "Yes, for each offline status change (payment, cancellation, etc.)."
- Select the "Test info" tab.
- In the "Test info" section; select "I would like to simulate transaction results based on the card number.".
2.2 Magento ®
2.2.1 Payment services
Perform the following steps after the installation of the extension:
- Log on to your Magento ® back office.
- Go to "System > Configuration > Sales > Payment services". The option “Worldline Account” will be available.
- Select the option and fill in the following information:
| Setting | Description |
|---|---|
| PSPID | Fill in the PSPID of your Worldline account. |
| SHA-IN Pass phrase | Fill in the SHA-IN passphrase that you have setup in your Worldline back office at "Technical information > Data and origin verification". |
| SHA-OUT Pass phrase | Fill in the SHA-OUT passphrase that you have setup in your Worldline back office at "Technical information > Transaction feedback". |
| Environment | Choose the Worldline environment which you want to connect with: Test or Production. Alternatively, you can select the "Custom" option, which allows you to fill out a URL of your own choice. |
| API User / API Password | Fill in the API details that you have created in your Worldline back office. |
| Payment template | When you select Magento ® - Interal shop template, the payment page will be in the same layout as your shop. When you select one of the Worldline options, all the fields that follow with reference to the Worldline template are then mandatory to fill in.
|
| Order reference in case of redirect (or inline) payments |
With this option can be specified if the Orders increment ID or the Quote ID should be transferred as a payment reference for the orders to Worldline. The Order ID is the number in format 100000001, which is listed in the backend order grid in column "Order #". In case the "Order ID" is selected this number will be transferred during the payment process to Worldline. Because of compatibility reasons a hash sign is added before the Order (increment) ID. If "Quote ID" is selected this number will be transferred to Worldline. The Quote ID is also the only mode for all inline payment methods like credit card (if activated), direct debit and Kwixo. |
| Show Quote ID in the order grid |
If activated the Quote ID will be added as a column in the backend order grid. |
| Device ID |
Enables the tracking of the customer for fraud detection purposes |
| Submit extra parameters |
If activated additional parameters are transmitted to Worldline in order to make use of fraud detection or the Paypal Seller protection. |
| Resend payment information identity / template | You can send an email to your customers if their payment has failed at Worldline (status 0 or 2). The mail contains a link to the Worldline payment page, where the customer has the option to re-enter his payment details in order to recover the order.
|
| Debug | When this option is selected, all requests and answers from Worldline will be checked. We recommend you to only activate this option when you are in test mode and not in production mode. The debug file is stored on the fileserver in /Var/Logs/ops.log |
Note: At "System > Configuration > General > Web > URL options", we advise to disable the option "Add store code to URL's" since this can introduce incorrect behavior of the extension.
2.2.2 Payment methods
Configure your payment methods via System > Configuration > Payment Methods.
Note that you should only activate payment methods that are activated in your Worldline back office via "Configuration > Payment methods > Selected payment methods".
You can configure the applicable countries for each payment types. For example: if the Netherlands is selected as the invoicing country for iDeal, it will not appear under a different invoicing country.
To activate and make further changes please contact our Customer Care department via admin.ecom@ingenico.com.
2.2.3 Configuration
Configure the payment method:
| Setting | Description |
|---|---|
| Enabled | If you want to offer this payment method to your customers then choose 'yes'. |
| Title | If you want to use a custom title for this payment method, you can enter it into this field. |
| Sort Order | Define the position for this payment method in the checkout. |
| Estimated Delivery Date | Define estimated number of days until delivery after the order is paid. |
| RNP Fee | You can invoice the RNP fee. To do so, choose 'yes' in this input field. |
| Default Shipping Method Type | You can choose the default shipping method e.g. "Pick up at merchant". |
| Default Shipping Method Speed | Define the default number of hours required for the delivery e.g. "24". |
| Default Shipping Method Details | Define optional details for the shipping methods. |
Configure the shipping method:
- Click on the "Kwixo shipping setting" link. As a result the shipping configuration section opens.
- Configure the setting as described in the table below.
- Click the "Save" button.
| Setting | Description |
|---|---|
| Shipping method type | Define the Magento ® shipping method e.g. "Flat Rate". |
| Kwixo shipping type | Define the Kwixo delivery method for the orders which are shipped with the Magento ® shipping method. |
| Shipping method speed | Define the number of hours required for the delivery e.g. "24". |
| Shipping method details | Define additional default details for the shipping method. |
If the customer uses a Kwixo payment method, the configured settings will be transmitted to Kwixo, if no values are set, the default values are used.
If you want to use the Kwixo payment methods, you need to configure a proper mapping between Kwixo categories and the categories of your store:
- Click on the "Kwixo Category Mapping" link. As a result the category configuration section opens.
- Select a Magento ® category in the tree structure at the left hand side.
- In the "Categories configuration" section at the right hand side:
- Select a "Kwixo category" from the drop down menu (e.g. "Home & garden").
- If applicable, select the "Apply to sub-categories" option.
- Go back to step to until all categories are mapped.
- Click the "Save" button.
2.2.4 Open invoice payment method
Enable the following additional settings at "System > Configuration > Customer Configuration > Name and address options":
- Display Birthday
- Display VAT number (only applicable for Open Invoice NL)
- Display Gender
Note: If you use Afterpay as acquirer on our side, it is not possible to perform partial captures with Open Invoice NL).
When you activate Open Invoice AT via Klarna, the following prerequisites should apply:
- The “Title” must be set to “Kauf auf Rechnung - zahlen in 14 Tagen”.
- The logo must be uploaded and made available on https://developers.klarna.com/en/at+php/kpm/logos.
- The data encoding must be set to “other” as the current integration does not support UTF-8 encoding.
- The “Invoice terms title” must be set to “Rechnungsbedingungen”.
- The “Invoice terms url” must be set to https://cdn.klarna.com/1.0/shared/content/legal/terms/123/de_at/invoice?fee=0#
- A partial capture or partial refund via Magento is not possible. These actions can only be executed via the Worldline Back-Office.
- Magento should not send invoice on capture/refund to the consumers, Klarna will send the invoice. During the capture/refund, the setting “Email Copy of Invoice” should be unchecked.


2.2.5 Intersolve payment method
You can add several brands, which are related to specific Worldline payment methods.
These brands have to be configured in advance in the Worldline back office before they can be used in your shop. You can assign a customised "Title" to each "Brand" which is shown to the customer at the checkout page.

2.2.6 Credit card with Alias Manager payment method
The Alias Manager refers to the Worldline Alias Manager.
Configuration:
| Setting | Description |
|---|---|
| Enabled Alias Manager | If enabled your customer has the option to save his credit card payment information and to reuse the saved information for future payments. This information can only be saved for cards that support online payments. |
| Show Alias Manager information for guests | If enabled a hint informs your guest customers about the advantages of saving credit card details, since this is only available to customers who are logged in. |

For a correct usage of this feature, you need to execute periodically the cron.php which is located in the Magento ®'s root directory. On a Unix or Linux based System you have to add one of the following entries to your crontab:
|
For further details on the usage, go to Credit card with Alias Manager.
2.2.7 Paypal with seller protection payment method
Configure the following settings:
| Setting | Description |
|---|---|
| Configuration > General > State options > State is required for | Select the countries for which the state is mandatory according to the requirements of the Paypal's seller protection. |
| Configuration > Payment Services > Worldline account > Submit extra parameters | Set to 'Yes' to transmit the necessary parameters to Worldline. |
2.2.8 Device fingerprinting
This feature allows the extension to fingerprint customer devices for Worldline to collect and hash data (such as screen resolution, user agent, etc.) into a key. There are legal caveats in some European countries thus customers should be consented on the collection of these data.The device fingerprinting can be activated/disable per transaction. This is indicated by a special parameter for e-Commerce transactions. For DirectLink transactions, information will have to be collected by tracking pixels on the site.
Integration via JavaScript Hook
The extension provides a JavaScript function to handle customer's consent in the checkout. Customers can also add the file(js/netresearch/ops/deviceFingerprinting.js) to other parts of the shop to have access to the
functions described below. This can be done via the following code:
consentHandler.toggleConsent( consent , callback );Consent: Boolean and the target state of consent that should be saved in the customer session.
Callback: An optional function that should get called with the saved consent after it has
been saved.
The consent handler also has a function of retrieving the current consent status via
consentHandler.getConsent (callback)As with the other function the callback will be called with the result of the request (the current state of consent).
Integration via custom call to provided Controller
Consent can also be indicated by calling a controller directly on the following url:
http://www.yourshop.tld/ops/device/toggleConsent
The parameter "consent" is expected for the request. It will get casted to boolean and saved to
the customer's session. As response of the current consent state as JSON will be for example:
{"consent":false}
A current state of consent can be viewed here: http://www.yourshop.tld/ops/device/consent
The pre-built JavaScript functions call these urls.
2.2.9 Usage
Your customer has created and submitted an order with the available form:
- If not all parameters can be detected, the customer has the option to enter the missing data.
- The customer is redirected to Worldline.
2.3 General
The extension works like most Magento ® extensions. If you have selected to process credit cards, they will be processed via the Magento ® platform. However, when 3D Secure is activated, the cardholders will be redirected to the Worldline payment page.
This is also applicable for any other payment method where the account holder’s details need to be confirmed by the issuer. When the transaction is processed, you can see the transaction in your Magento ® back office via "Sales > Orders".
The plugin automatically sends the parameter SHOPPINGCARTEXTENSIONID along with any transaction to our platform. This information can be retrieved for any transaction in our Back Office via Operations > View Transactions > Shopping cart extension ID.
The value contains this information on the plugin used following the formula PSPbrand-PaymentEngine-PluginBrand-PluginVersion (ie. Ingenico-M2-OGONE-3.5.0).
2.3.1 InterSolve payment method
While configuring in Magento ®, you can define several brands, which can be selected by the customer during the checkout process. The selected brand will be transmitted to Worldline.
If only one brand is defined, the customer can't select a brand but it is directly displayed and it will be immediately transmitted to Worldline.
2.3.2 Credit card with Alias Manager payment method
When using the payment method "credit card" and the activated feature Alias Manager, a logged in customer gets his stored credit card information shown, if he saved it previously.
If the customer is not logged in a hint is displayed that informs the customer about the possibility to store his credit card data for reuse.
If the customer clicks the link in the hint text, he will be directed to the "checkout method" step and the "register" option will be selected.
The selection of the displayed payment information depends on billing address and shipping address in order to prevent abuse.
If your customer wants to save his payment information, he has to select that option in the credit card payment screen.
If saved credit card data is available, the form on the credit card payment screen will be pre-filled and the input fields will be greyed out.
If the customer wants to update his saved credit card data, the customer has to:
- Click in one of the greyed out input fields. As a result all input fields will be cleared.
- Enter the new credit card data.
- Select the "Save payment information" option. If it's not checked the new payment information will be used for the payment but it's not stored and the old payment information is still available for further use.
If you want to view and/or delete the customer his payment information, you have to:
- In the Worldline back office, go to "payment information" and execute the specific action.
- In Magento ®:
- Go to "customers > manage customers".
- Click on the row of the customer.
- Select "Payment information".
- Execute the specific action.
2.3.3 Direct Debit payment method
You can use the direct debit payment method for Austria, Germany and the Netherlands which allows you customer to use his account data for payments.
Overview of the features:
| Origin of the direct debit payment method | German | Austrian | Dutch |
|---|---|---|---|
| Customer has to insert account number (Kontonummer, rekeningnummer) |
X | X | X |
| Customer has to insert bank code (BLZ) |
X | X | |
| Customer can insert IBAN |
X | X | |
| Customer can insert BIC | X | X |
Note: if the customer inserts both IBAN and BIC, and the according account data then both IBAN and BIC is used for processing the payment.
You can also use the direct debit payment method for so called MOTO transactions in Magento ®. This means that you accept and insert manually Mail Order/Telephone Order transactions and the behavior will be the same as described above.
2.4 Shipment receipt
The creation of a shipment receipt is made without a connection to the payment service and therefore behaves like Magento ®-Standard.
2.5 Cancellations
In case the authorisation was successful, you have the "Void" button at your disposal in the Magento ® "order view" (at "Sales > Orders" and click your order). You have to cancel by using this "Void" button instead of the "Cancel" button (because of gateway workflow reasons).
If the cancellation is successfully processed by Worldline, it can be necessary in some Magento ®-versions that you click the "Cancel" button in order to set the correct cancel status in Magento ®.
In case the order has the "Pending Payment" state and the Worldline-state "0" or "empty", you can cancel the order by using the "Cancel" button:
- No gateway request is sent to Worldline.
- The stock is increased again.
| Check beforehand the payment status in the Worldline back-office otherwise you won't be able anymore to update the status in Magento ®. |
2.6 Invoicing
Whether you have chosen "Authorization" as "Payment Action" in the Magento ® configuration, you have always to create an invoice for credit cart payment methods to trigger the capture process by Worldline.
To create an invoice:
- Go to the Magento ® "Order view" (at "Sales > Orders" and click order).
- Click on the "Invoice" button.
- Choose "Capture Online" as amount.
- Click the "Submit Invoice" button.
2.7 Refunds / Credit Memo
To create a refund:
- Go to Sales > Invoices.
- Click the invoice to refund.
- Click on the "Credit Memo" button.
- Adjust the amount to refund.
- If you want, select the option "Close Worldline transaction".
- Click the "Refund" button to confirm. Do not click the "Refund Offline" button!
- Repeat this procedure until the Worldline transaction is closed. That means either the complete amount is already refunded or you have selected the "Close the Worldline transaction" option. In the last case only offline refunds are available.
Depending of the payment method, the refund will be executed immediately or after a delay by Worldline.
|
The "Credit Memo" button at "Order view" only creates an internal refund and triggers no refund action by Worldline. For some payment methods (e.g. iDEAL), you have to enable refunds in your Worldline account. |
2.8 Additional information
To get additional payment related information about the order:
- Go to "Order view" at "Sales > Orders".
- Select "Information".
- Check the “Payment Information” section. The information includes:
- Payment method type (e.g. VISA credit card)
- Payment ID
- Recent payment status
- Currency
- Check the "Comments History" section. This section contains the history of the payment status changes. This information can help you to verify that a credit card authorisation has changed due to a payment capture.
2.9 Trigger payments in Magento ®
In the context of Worldline MOTO (Mail Order/Telephone Order) eTerminal transactions, some payment methods are available for order creation in Magento ®.
You can't use redirect payment methods, since they are not allowed. Also 3D secure ("Verified by VISA", "MasterCard Secure Code") you can't use.
To enable credit card and/or direct debit payment methods for MOTO eTerminal transactions, you have to put the "Enable for backend" option on "YES" at "System > Configuration > Payment methods > Select credit card and/or direct debit payment method".
| Immediately after you've inserted the order, Magento ® sends already some data to the shop. So you could have the impression that you have to click twice on the "Order submit" button. |
You can also email a link of the payment page where the payment can be completed. To support this functionality, you need to activate this option via System -> Configuration -> Payment Methods -> PayPerMail.
2.9.1 Payment using existing Worldline transaction
With this payment method, which is only available in Magento ® and not in your shop, you can enter directly the PAY ID of an existing Worldline transaction.
In that case no request is triggered to Worldline and you will have to execute manually all state changes.
3. Notes
3.1 General
The following statuses can appear in Magento ®:
- No credits in Worldline back office: This means that you can only send your credit requests via Magento ®.
- 3D-Secure (MasterCard, SecureCode and Verified by Visa) must be activated: This means that your Worldline account must accept 3D-Secure.
3.2 Multistore
You can use the extension in Magento ® Multistores with:
- multiple websites
- multiple stores
- multiple domains
- multiple Worldline accounts
In order to use multiple Worldline accounts, you have to follow the steps mentioned in Worldline back office and Magento for each Worldline account and website or store.
Most important is that you setup correctly the response urls in the Worldline back office:
- Go to "Configuration > Technical information > Transaction feedback".
- Configure the following fields:
- Direct HTTP server-to-server request
- HTTP request for status changes.
The correct configuration of these urls is clarified with the following examples.
3.2.1 Example: store code in url using the same Worldline account
The Multistore consists of two stores which are assigned to the same website. The example is also valid in case both stores were assigned to different websites:
- Store A operates under http://www.my-shop.com/shopa/
- Store B operates under http://www.my-shop.com/shopb/
The correct configuration in the Worldline back office is the following:
- Direct HTTP server-to-server request: http://www.my-shop.com/shopa/ops/api/postBack
- HTTP request for status changes: http://www.my-shop.com/shopa/ops/api/directLinkPostBack
The feedback will be processed correctly for store B, also if the response is send only to the url of store A.
3.2.2 Example: different domains and different Worldline accounts
The multistore consists of two stores which are assigned to different websites and uses two different Worldline accounts:
- Store A operates under http://www.my-shop-a.com/
- Store B operates under http://www.my-shop-b.com/
The correct configuration for Store A in the Worldline back office is the following:
- Direct HTTP server-to-server request: http://www.my-shop-a.com/ops/api/postBack
- HTTP request for status changes: http://www.my-shop-a.com/ops/api/directLinkPostBack
The correct configuration for Store B in the Worldline back office is the following:
- Direct HTTP server-to-server request: http://www.my-shop-b.com/ops/api/postBack
- HTTP request for status changes: http://www.my-shop-b.com/ops/api/directLinkPostBack
3.2.3 Example: different domains using the same Worldline account
The multistore consists of two stores which are assigned to different websites and the same Worldline account:
- Store A operates under http://www.my-shop-a.com/
- Store B operates under http://www.my-shop-b.com/
The correct configuration for both stores in the Worldline back office is the following:
- Direct HTTP server-to-server request: http://www.my-shop-a.com/ops/api/postBack
- HTTP request for status changes: http://www.my-shop-a.com/ops/api/directLinkPostBack
You also have to configure Magento ®'s base url for Store B:
- Go to "System > Configuration > General > Web".
- Insert "http://www.my-shop-b.com/" in the "Base URL" and "Base Link URL" fields in the "Unsecure" section. Use/keep the default value for the other fields of the "Unsecure" section.
- Insert "https://www.my-shop-b.com/" in the "Base URL" and "Base Link URL" fields in the "Secure" section. Use/keep the default value for the other fields of the "Secure" section.
3.2.4 Example: store code in url using different Worldline accounts
The multistore consists of two stores which are assigned to the same website and uses two different Worldline accounts. The example is also valid in case both stores were assigned to different websites:
- Store A operates under http://www.my-shop-a.com/
- Store B operates under http://www.my-shop-b.com/
The correct configuration for Store A in the Worldline back office is the following:
- Direct HTTP server-to-server request: http://www.my-shop-a.com/ops/api/postBack
- HTTP request for status changes: http://www.my-shop-a.com/ops/api/directLinkPostBack
The correct configuration for Store B in the Worldline back office is the following:
- Direct HTTP server-to-server request: http://www.my-shop-b.com/ops/api/postBack
- HTTP request for status changes: http://www.my-shop-b.com/ops/api/directLinkPostBack
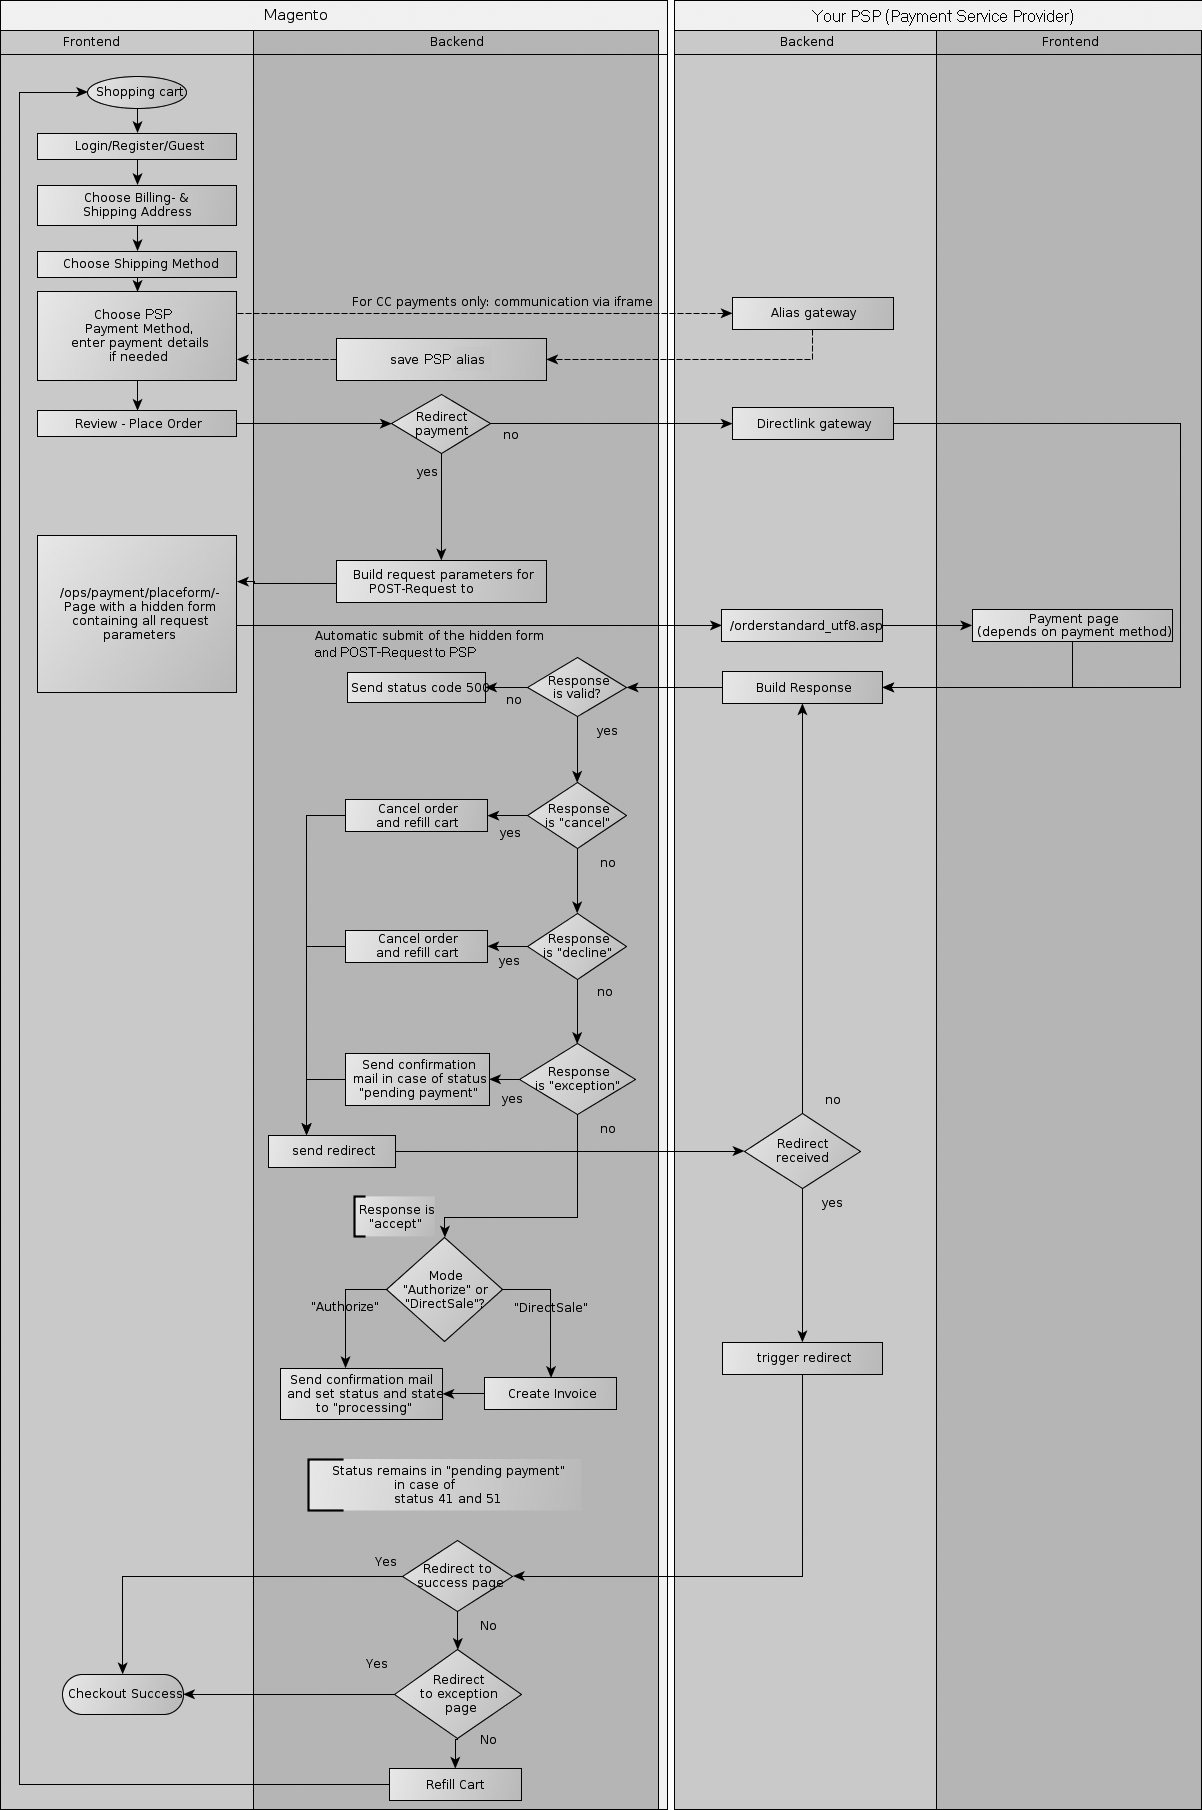
4. Payment workflow
4.1 Installing Magento 2 and above
Please access Magento Marketplace for more information about our Magento 2.x extension.
|
IMPORTANT: End of support for Magento version 1.X on June 30th 2020
|
5. Disclaimer
Copyright © 2016 Ingenico ePayments .
All trademarks, service marks and trade names referenced in this material are the property of their respective owners. The information contained herein is provided as a courtesy and is for general informational purposes only. This information is not intended to be a complete description of all applicable rules, policies and procedures. The matters referenced are subject to change from time to time, and individual circumstances may vary.
Ingenico ePayments shall not be responsible for any inaccurate or incomplete information. The information contained herein includes, among other things, a compilation of information received from third parties, and any such information is and shall remain the property of its respective owner. Nothing contained in this presentation is intended to supplement, amend or modify any applicable contract, rule or regulation.
Ingenico ePayments has given extensive attention to the content of this information but makes no warranties or representations about the accuracy or completeness of it. Neither Ingenico ePayments nor any of its affiliates shall be liable for any costs, losses and/or damages arising out of access to or use of any content of this document. Because of the complexity of the process and the right of Banks to alter conditions, this document can only serve as a description and is subject to further modifications.
The Extension referred to in this document was developed as a generic solution. Ingenico ePayments shall not be responsible for any damages that are caused by the extension. In the event that the Extension is modified by a user in any way Ingenico ePayments shall not be responsible for any damages that are caused by the modified Extension. The description of the Extension in this document is provided for convenience purposes only, and Ingenico ePayments makes no warranties or representations about the use or operation of the Extension. Neither Ingenico ePayments nor any of its affiliates shall be liable for any costs, losses and/or damages arising out of access to or use of the extension.
6. FAQ
In case of questions or problems, please take a look at http://ingenico.support.netresearch.de/support/solutions
If you don't find an answer, please contact support@ecom.ingenico.com
FAQs
PayPal Seller Protection is a way to make accepting payments through PayPal even more secure and hassle-free. It safeguards your business against losses from charge backs and payment reversals, so that you can:
- Spend less time dealing with claims of items not received
- Protect yourself from losing money to payments made with stolen credit cards
- This enhanced protection is available free of charge when you connect your Magento webshop to Worldline ePayments's payment processing services, using the latest Worldline ePayments Magento Extension.
To qualify for the Seller Protection guarantee, all you need to do is ensure your PayPal transactions include the following shipping details:
- First name
- Last name
- Address
- City
- Post code
- Country code
- Whenever a buyer makes a claim, chargeback or payment reversal, you simply provide PayPal with proof of delivery or proof of shipment and they will release any held funds.
You can find out more about our free Magento plug-in and how to accept PayPal and other payment methods through your Magento webshop here.