Sofort Banking
1. Introduction
1.1 What to configure
At Sofort Banking, a configuration is known as a “Project”. Before you can use Sofort Banking, you will need to do the following:
- You must be registered and have a user ID and project on the Sofort website. The process for creating a project is described here.
- You must complete the Sofort Banking project details on the Sofort payment method configuration page in your Worldline back office. The configuration in your Worldline account is described here.
1.2 How to configure
You can configure the necessary steps either automatically or manually.
1.2.1 Automatic configuration
The configuration process is initiated in your Worldline back office on the Sofort payment method configuration page.
A Sofort Banking userID and projectID can be obtained automatically by clicking a button on the payment method configuration page in your Worldline back office. This way, most of the project details will be pre-configured by Worldline in the Sofort Banking website.
If you would like to create a configuration automatically, please see here.
1.2.2 Manual configuration
The configuration process is initiated on the Sofort Banking website.
You must first create your user and project manually on the Sofort Banking website and, after that, enter the necessary payment method configuration details in your Worldline account.
1.3 IMPORTANT – Missing funds for status 9 transactions
There is a very low chance (between 1 to 2 % of all your Sofort transactions) that a successful Sofort transaction (status 9) will not be paid out to you eventually.
In these rare occasions, the customer’s bank account doesn’t have sufficient funds available at the specific time frame when bank transfer is effectively executed.
Would you have further questions about this, you can contact Sofort GmbH.
2. Worldline account configuration
The Sofort Banking payment method can be configured via the “Payment methods” link in the back office.
2.1 Configuration with automatic registration and/or project creation at Sofort Banking
If you have not yet created a project on the Sofort Banking website, you can create one automatically by clicking the “Obtain UserID and ProjectID for this Payment Method” button. You will then be redirected to the Sofort Banking website. Worldline provides most of the configuration information directly to Sofort Banking.
If you already have a Sofort Banking account, click the option “I have registered already for sofort.com” and a project will be created in your existing account.
If you have not yet registered for Sofort Banking, click the option “I am not a customer yet”. The system will then create a new account and a new project for you.
|
When you click the “Obtain UserID and ProjectID for this Payment Method” button in your Worldline TEST account, a TEST project will be created at Sofort Banking. When you click the “Obtain UserID and ProjectID for this Payment Method” button in your Worldline PROD account, a PROD project will be created at Sofort Banking. |
Once the project has been created and configured, you need to enter the project details (User_ID, Project_ID and Project password) in the Sofort Banking payment method configuration page.
2.2 Configuration after project creation at Sofort Banking
You must now enter the project details (User_ID, Project_ID and Project password) of the project you created on the Sofort Banking website.
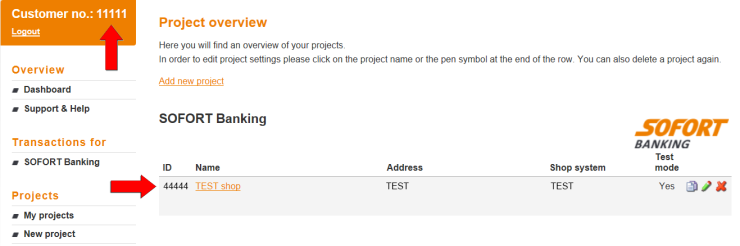
The User_ID and the Project_ID can be found in the project overview in your Sofort Banking account. In the example below the User_ID is “11111” and the Project_ID is “44444”.
You can find the Project password in the "Extended Settings" tab for your project > "Project Password and Input check".
Click (Activation) “Yes” and “Submit” in the Sofort Banking payment method configuration page in your Worldline account.
3. Sofort Project Configuration
To enter the Sofort Banking back office, go to https://www.sofort.com, click on “Merchant” and then "Login"complete your login details.
3.1 Create a project
- Click on “My Projects” in the Projects menu.
- Click on the “Add new project” link in the Project overview page.
- On the “Choose your project type” page, select "Create a SOFORT Classic project".
3.2 Basic settings
Remark: The notification password must not be set! If the notification password (Benachrichtigungskennwort) is set, it can be cleared on request by Sofort.
3.2.1 Interface
In the “Interface” section, you need to configure the following URLs:
Success link:
https://secure.ogone.com/ncol/prod/order_anetb_flowhandler_utf8.asp?op=success&TXID=-TRANSACTION-&PAYID=-USER_VARIABLE_0-&PM=-USER_VARIABLE_1-&HASHPSP=-USER_VARIABLE_2-&SIGN=-USER_VARIABLE_3_HASH_PASS-
Abort link:
https://secure.ogone.com/ncol/prod/order_anetb_flowhandler_utf8.asp?op=cancel&PAYID=-USER_VARIABLE_0-&PM=-USER_VARIABLE_1-&HASHPSP=-USER_VARIABLE_2-&SIGN=-USER_VARIABLE_4_HASH_PASS-
Enable the “Automatic redirection” checkbox. The “Show feedback page” checkbox is optional.
3.2.2 Other
Enter your details in the “Address”, “Common settings for Sofort.com” and “Bank account” sections.
Click on “Save” when you have finished your “Basic settings” configuration.
3.3 Extended settings
You need to configure some extended settings for your project via the Extended Settings tab.
3.3.1 Shop System Interface
On the “Shop system interface” page, you will see the Success and Abort links that you entered earlier in the “Interface” section of the Basic Settings tab, and an additional section, called Timeout.
Configure the value “900” for the Timeout in seconds.
Configure the following URL for the Timeout link:
https://secure.ogone.com/ncol/prod/order_anetb_flowhandler_utf8.asp?op=cancel&PAYID=-USER_VARIABLE_0-&PM=-USER_VARIABLE_1-&HASHPSP=-USER_VARIABLE_2-
Enable the “Skip first steps” checkbox in the “Skip steps” section.
Click on “Save” when you have finished your “Shop System Interface” configuration.
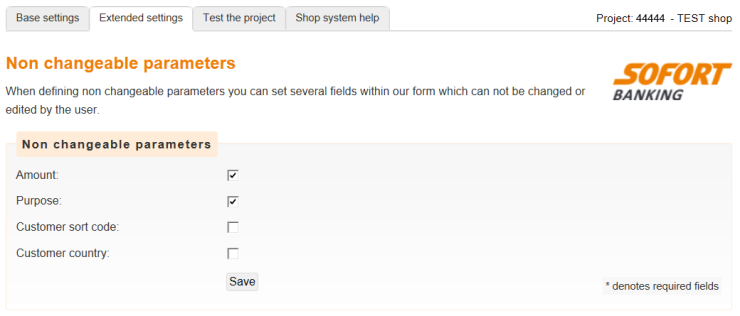
3.3.2 Nonchangeable parameters
Configure the nonchangeable parameters as follows and click "Save":
3.3.3 Notifications
In the Notifications page there are two types of notifications: email and HTTP.
You can add new/additional notifications by clicking the "Add new notification" link.
Enter your e-mail address in the "E-mail" field, select your language, enable the "activated" checkbox and click "Save".
HTTP
Enter the URL in the “Notification URL” field, enable the “activated” checkbox and click “Save”.
HTTP Notification URL: https://secure.ogone.com/ncol/prod/Order_AnetB_Direct_utf8.asp?op=serverserver
3.3.4 Project password and input check
Choose a password, and complete the "Input Check" as shown below.
The password chosen here is the one you need to enter in the "Project password" field in the Sofort Banking payment method configuration page in your Worldline back office.

Preguntas más frecuentes
El tiempo de activación de un método de pago depende de diversos factores. Le pedimos que tenga en cuenta lo siguiente:
- la entidad adquirente o el banco pueden tardar varios días (o incluso semanas) en completar su afiliación. Por supuesto, si ya tiene una afiliación, la activación sólo nos llevará unos pocos días.
- Algunos métodos de pago requieren cheques adicionales antes de ser activados, por ejemplo, en el caso de 3-D Secure, lo que solicite directamente VISA o MasterCard
Con classic.collect puede activar varios métodos de pago a la vez
Una entidad adquirente es una institución financiera que procesa pagos de determinadas tarjetas de crédito y débito. La entidad adquirente es responsable de la parte financiera del procesamiento de la transacción e Worldline es responsable de la parte técnica. Dicho de otro modo, sin una entidad adquiriente, el dinero no se transferirá a su cuenta bancaria.
Por cada método de pago en línea que desee agregar, necesitará un contrato de aceptación con una entidad adquirente. Si desea que le aconsejemos acerca de la entidad adquiriente más adecuada para usted y su región, por favor contáctenos. Si sabe con qué entidades adquirentes desea trabajar, selecciónelas en la lista desplegable al añadir un método de pago en su cuenta.
Como alternativa, puede permitirnos que nos encarguemos por usted. Full Service le permite activar muchos métodos de pago locales, todos a la vez y en varios países distintos con un solo contrato. Si vende en otros países, podría ser la forma ideal de aceptar pagos de toda Europa. Le ahorra tareas de administración que llevan mucho tiempo y, como puede ofrecer más métodos de pago, también podrá aumentar sus ingresos.
Obtenga más información sobre Ingenico Full Service aquí y poniéndose en contacto con nosotros y solicite información sobre contratos.